If you don’t want YouTube to normalize your audio, this is how to set your loudness to -14 LUFS in DaVinci Resolve.
YouTube has in-depth guidelines for uploading videos, which you can see in their help forums. When it comes to audio, however, YouTube is less stringent. And that’s okay for most people. It’s typically the last thing you worry about when editing a video, and as long as the audio doesn’t sound distorted, most viewers won’t notice the audio mix.
But not correctly mixing the audio levels can lead to your video sounding worse. That’s because YouTube normalizes audio that is too loud, which brings down the overall mix to sound softer and more compressed. So the only way to ensure YouTube won’t fiddle with your audio is by mixing your audio to the appropriate loudness.
Though YouTube doesn’t publicly mention its loudness standard anywhere on the internet, it’s widely known that YouTube requires a loudness measurement of -14 LUFS. LUFS stands for “loudness units full scale,” which calculates the average loudness of the entire audio track over time. It’s also well-known that an audio mix for YouTube should have a true peak level between -1 and -2 dBTP. The true peak is the measurement of the loudest parts of your audio mix. A true peak level over 0 dBPT will sound distorted, so it’s best to stay below that.
If you’re a DaVinci Resolve user, this is how you set your audio mix to YouTube’s target loudness — and here are more tips for using DaVinci Resolve.
Configuring the Correct Settings
Before you start messing around with the audio levels, you must set the correct project settings. To do this, click on the gear icon on the bottom-right corner of Resolve, then select “Fairlight.” Once there, find the setting labeled “target loudness level,” and set that to -14 LUFS. Save your project settings, and then head to the Fairlight tab of Resolve.
In the Fairlight tab, you’ll notice a few audio meters in the top-right portion of the screen. The one control room meter will tell you the true peak level, which is labeled as “TP.” To the right is the loudness meter. The left meter with an “M” measures the loudness of the current frame, while the meter on the right measures the loudness of all channels. The number at the top of the right audio meter is the maximum loudness unit, which is measured in LUFS.
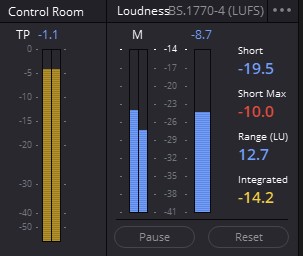
You’ll also notice four other numerical measurements in the same loudness meter section. “Short” measures the average loudness units over the past 30 seconds. “Short max” shows the maximum loudness units within the last 30 seconds. The “range” displays the dynamic range of the audio mix, which is the difference in loudness units between the loudest and softest parts of the mix. Finally, “integrated” tells you the average loudness of the mix; it’s the most important measurement of the four.
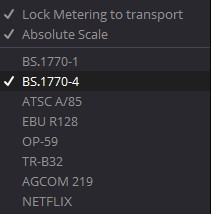
To set up the loudness meter correctly, open the drop-down menu by clicking the ellipsis icon in the loudness meter. Once here, toggle on the “lock metering to transport setting,” which resets the loudness meter every time you move the playhead — it will save you a lot of time. Next, toggle on “absolute scale” to set -14 as the target number on the meter. Finally, select “BS.1770-4.” This is the most recent loudness algorithm used for broadcasting, and it’s the one you need for mixing audio for YouTube.
Monitoring Audio levels
There are a few ways to find the current loudness of your audio mix. The easiest route is to play the entirety of your audio mix and look at the integrated reading in the loudness meter. This can take forever, though.
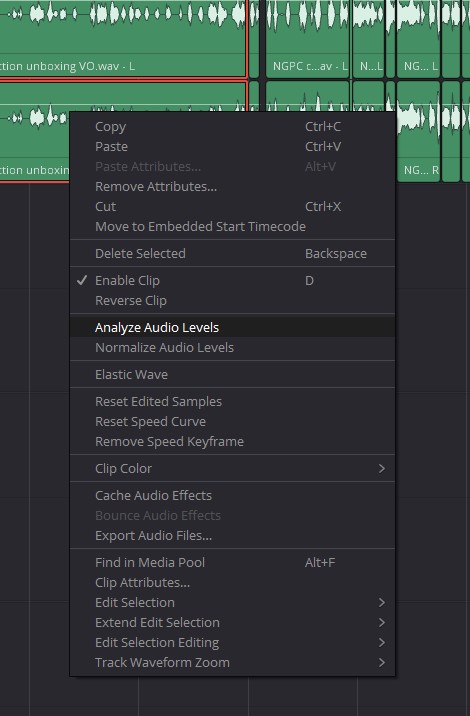
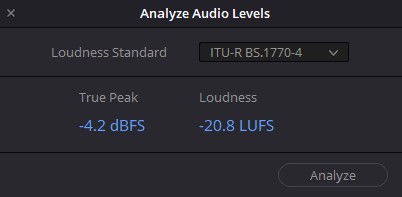
A quicker way to do it is by selecting all the clips in your audio mix and analyzing audio levels, which you can do by right-clicking on any clip to bring up the menu. In the “analyze audio levels” box, you only need to set the loudness standard to “ITU-R BS.1770-4,” which is the same loudness standard you set earlier in the loudness meter. Then, hit the “analyze” button to see the true peak and loudness readings. You’ll then have a better idea of how much or how little you need to adjust the audio mix to bring it closer to the target loudness.
Alternatively, if you have multiple audio tracks, you can combine all the audio into one track by going to timeline > bounce mix to track > new track > ok. With all the tracks combined, you can run the same loudness analysis explained in the paragraph above.
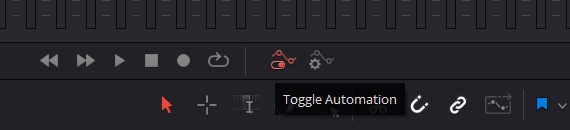
You can also see the loudness history of your audio mix on a graph if you’re more of a visual learner. To do this, you need to toggle on the automation button and then expand the “Bus 1” track until you see the graph. Within this track, toggle on loudness history, and select integrated to see the average loudness units over time.

Adjusting Your Audio to the Correct Loudness
There’s no one way to bring your audio levels to the target loudness, but there is a way that works for me and doesn’t take up too much time. Whether the mix is too loud or too soft, the easiest way to adjust sound levels is by using the mix sliders on the right side of the screen. Each track has a slider, with a main Bus track that combines all other tracks. You can adjust individual tracks, especially if their sound levels are very different, or you can adjust the slider on the Bus track to make an overall adjustment to the mix. How much you need to move the slider depends on the loudness of the mix, but there is a limit to how far you can increase the audio levels before it begins to clip.
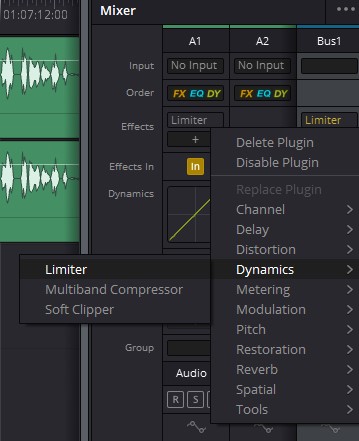
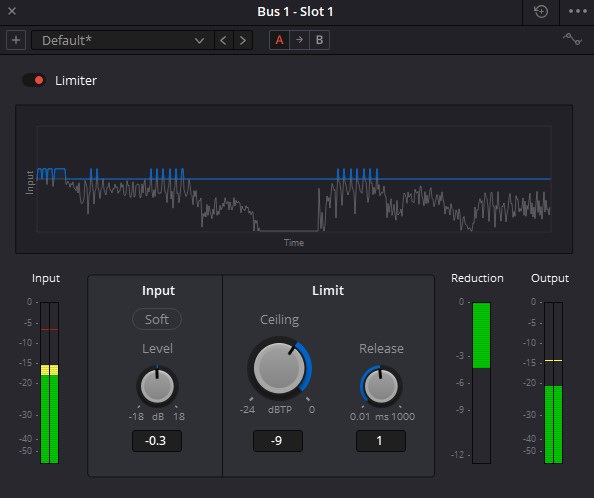
When you crank up the audio levels to get a loudness of -14 LUFS, you may get a true peak level that’s too high. In this case, you need to apply a limiter to the mix, which will reduce the loudest parts of the mix. You can apply a limiter by clicking on the “+” icon above the Bus mix in the mixer section to bring up a pop-up menu. You then need to hover over “dynamics” and then click on “limiter,” which will bring up the limiter window. To lower your true peak level, you’ll need to adjust the knob labeled “ceiling.” If you made big adjustments to the mixer sliders, you might also need to make a bigger adjustment to the ceiling. However, it’s best to make incremental adjustments to the ceiling knob. So long as the true peak is anywhere between -1 and -2 dBTP, you’ll be fine.
Softer Is Better
Mixing your audio to the target loudness will make your videos sound the same from one video to the next, but the mix doesn’t have to be perfect. It’s okay to be a little off the mark, but it’s better if your mix is softer rather than louder. The reason is that YouTube will normalize any audio that is louder than -14 LUFS, but it won’t make changes to audio softer than -14 LUFS. So if you don’t want YouTube lowering your audio levels and ruining your mix, don’t go over -14 LUFS. Simple as that.
Looking for filmmaking tips and tricks? Check out our YouTube channel for tutorials like this . . .
Looking for more tips and tricks? Check out these articles . . .