Stock footage can sometimes stick out like a sore thumb in an edit. Here are some ways to make your stock elements blend in seamlessly.
If you need to punch up your edit with some footage that you don’t have, stock footage is your safest bet. However, sometimes, when you throw a stock clip into your project, it just looks different than everything else.
There are a number of reasons for this, but almost all of them are fixable. In my opinion, it’s almost always possible to make any clip less distracting in the context of your edit with just a little work.
The below video shows off some of my favorite methods to blend in footage and elements a little better in an edit.
You definitely don’t want your stock assets to distract your audience; you always want the footage to feel like it’s part of the same ecosystem as everything else.
You also don’t want to limit your ability to customize your assets to your client’s needs, especially as it relates to vector or design elements that you’ve used in a freelance project.
Whether you need to match your stock footage to a custom creative color grade or take your client’s brand colors and match them with something you’ve downloaded, there are ways to get results with minimal effort.
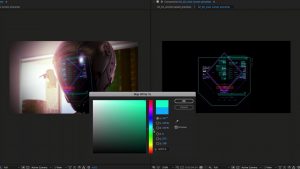
Rec709 VS. LOG Footage
One of the most common issues I run into when I’m trying to sneak some stock footage into my edit is that almost all stock footage out there conforms to Rec709 color space.
Rec709 is essentially the color space that our computer monitors and TV screens are currently capable of displaying, and it generally means that if you’ve conformed some LOG footage (a much wider color space with more dynamic range and color data) to this color space, you’ll see more contrast and more saturation than your LOG image.
I suspect the biggest reason that stock footage comes in Rec709 is so that it’s easier for the multitude of people who don’t know anything about color grading to put the footage into their edits and social posts without any effort. However, for us, this means we’ll have to do a bit of extra work.
One way is to convert your Rec709 footage over to LOG using some conversion LUTs like these free ones. Just pick whichever LUT from the “Generic Rec709 to LOG” folder matches your other footage best, and you’re off to the races.
This is not a scientifically accurate or ideal approach, but for a late-night edit, it will certainly do the trick.
Going Hyper-Stylized with Overlays
The other thing that’s neat about stock is that you can use stock on top of your stock.
By this, I mean you can use video overlays to add so much texture and style to your stock clips that the viewer won’t even be thinking about whether or not it matches anything else — it’s just a single, one-off, curated look that nobody will be able to shake a stick at.
Examples of this would be using film grain overlays, VHS textures, and even stuff like fog overlays to add your own flare to stock footage.
I like to use this approach when I’m doing something that involves titles or slates, where I can get super punchy and stylized with the backgrounds.
Customizing Vector Graphics and Designs

When it comes to stock downloadable vector graphics, like the free ones you’d find on freepik.com — you’ll often find that you’ll need to change some colors around or move different elements to fit your needs. For this, it’s probably easiest to use Adobe Illustrator, but also it’s not totally necessary.
I don’t like Illustrator. Never have. Therefore, I’ve gone to some pretty absurd lengths to make sure that I don’t have to use that blasted application just to change some colors or move some elements when I’m making a motion graphic in After Effects.
If you want to change colors, just use the Hue/Saturation or Change to Color effects from the color correction effects tab in After Effects. Change to Color allows you to select a specific color and change it to a different color, which is perfect for conforming to a brand guideline sheet.
Then, I’ve always made a habit of just making broad selections of specific parts of the design using the pen tool, that way I can resize specific things one at a time. As long as you’ve imported everything correctly, you should have all the layers you need to make things fit and animate them however you want.

Stock footage is a fantastic resource, mostly for adding energy and texture to something that would have otherwise been empty.
I’m a firm believer in having plenty of B-roll and visual changes to make sure things never go stale in your edit. I always say more than 10 seconds of someone talking with nothing else happening is probably too long.
Hopefully some of these tips will give you some ideas for how to use stock footage in your edit without anyone thinking you didn’t shoot enough footage for your project.
Looking for some music for your projects? At Videvo, our library has everything from free ambient music to music for streams — perfect for any indie project:
- Royalty-free Christmas music
- Royalty-free meditation music
- Royalty-free upbeat music
- Royalty-free jazz music
- Royalty-free Halloween music
Need a break? Check out our videvoscapes — the ultimate reels for relaxation or concentration. Each videvoscape collects hours of high-definition nature footage and background video with downtempo chill beats for the ultimate escape from the grind.