Shaky footage can make your project look unprofessional. Here’s how you can stabilize it in Adobe Premiere Pro.
There are many nifty tools in Premiere Pro to make your edit and your footage look more professional and polished — in this article, we’re going to discuss stabilizing your footage within Adobe Premiere.
Unfortunately, we can’t carry a tripod around with us for every shoot, and sometimes the run-n’-gun style makes a lot more sense for the project at hand. Whether you’re trying to save a shot from being too shaky or simply trying to remove a bit of movement to make the shot look more solid, stabilizing the footage in post may be the answer.
What Is Stabilization?
In simple terms, stabilization removes random and sometimes unwanted camera movement from your shot. This could be due to a little knock in the camera or some shakiness from a handheld shot. There are definitely times when organic camera movement is the right choice, but sometimes it’s great to have a steady-looking, locked-off shot, even if you didn’t make that choice while shooting.
Essentially, to achieve stabilization, Adobe Premiere will analyze your video clip and algorithmically decide how the camera is moving and what portions of the clip it should use as reference to stabilize from. Premiere will then use this data and counteract the movement with its own movements to simulate stabilized footage.
The most popular stabilization technique in Premiere is Warp Stabilizer, and that is what we’ll be using today.
Stabilizing Your Footage
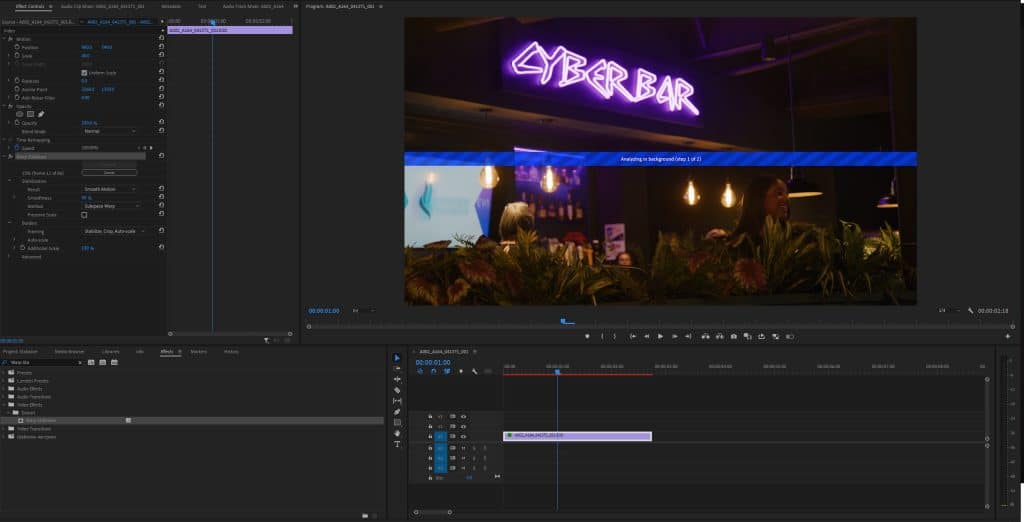
Quick stabilization is easy to get with just a few clicks. First, you want to drop your footage into your main timeline and be sure it’s resized to match the frame. Once you have the clip placed, head over to your Effects panel and find Warp Stabilizer. Drag it onto your clip.
You should see a little tag on your Program window over the clip that says “Analyzing in the Background.” This could take a couple seconds to a few minutes, depending on your codec, bitrate, movement complexity, and resolution. If you want to see its progress, the Warp Stabilizer effect will have a frame counter “ Frame 34 out of 72” and tell you how much time is left on its calculation.
Once Premiere has done its thing, play through the clip and see how it’s done its magic. I find, on most static, handheld clips, just simply adding Warp Stabilizer is enough, but if your clip has a bit more movement or complicated actions it may be worth tweaking some settings for the best results. While 50 percent smoothness is the default, I like to play around with this number and usually set it between 10-20 percent if I want a bit of smoothness but don’t want it to appear artificially stabilized.
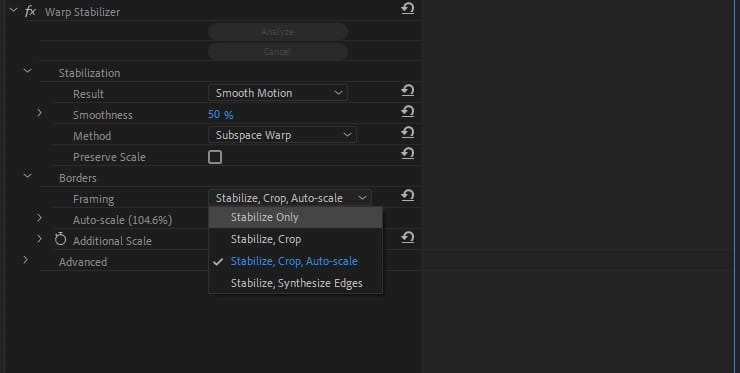
You may also notice that your clip is now a bit more cropped in than before. This is because Premiere needs some real estate to add the stabilization. Underneath the Borders option within Warp Stabilizer, you can change if you’d like it to crop, but you will be left with blank spaces in the areas it needs to use to stabilize. Synthesize Edges is an option, but your results may vary, as it’s making up pixels where the crop takes place to keep the same resolution.
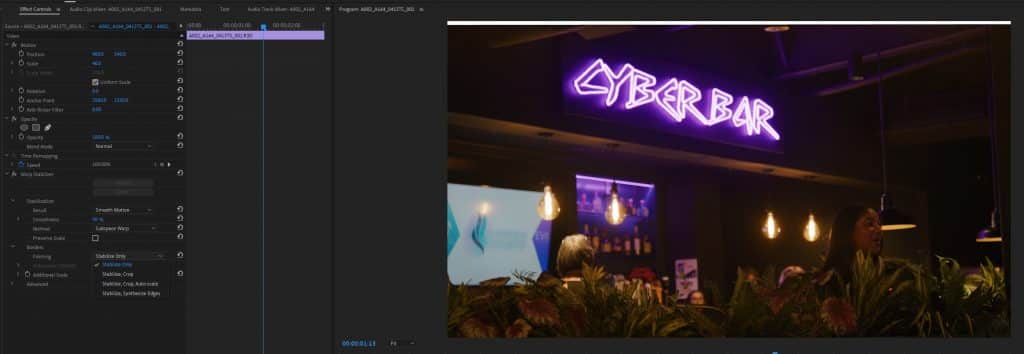
Using the Position, Scale, & Rotation option may also work for you if you’re looking for a more nuanced and straightforward approach to stabilizing.
If you’d like to further fine-tune the options, head into the advanced options and further tweak the settings. Allowing for a more detailed analysis may result in a better stabilization, but it will take quite a bit more time.
Tips and Tricks
If you’re just learning how to use Warp Stabilizer, it may take some time to get used to how it works, what shots can make great use of it, and how you can shoot with Warp Stabilizer in mind.
The biggest problem with the effect is a weird warp, Jell-o effect, or distortion that it can have on clips not suited for the effect. It’s very obvious once you’ve seen it, and it can be problematic in your work. This is caused by Premiere not knowing what to track and what to use for actual stabilization. More complicated shots with people moving, tracking, pans, or zoom will definitely see this issue. This is usually caused by one part of the frame being stabilized while the other part is still moving.
In my work, I like to use Warp Stabilizer as a tool to supplement, rather than correct problematic footage. I shoot a lot of run-n’-gun projects and can’t lug around a tripod. I’ll still film my big wides and establishing shots handheld, but I make sure I’m as steady as possible. When I drop stabilization on it in editing, I know it will work well. What I won’t do is try a complicated walking/tracking shot with pans and zooms. Premiere won’t be able to tell what’s what, and it will make the effect essentially useless. Stabilizing can rarely save a shot, but it can make your shots a touch better.
Be conscious of rolling shutter. Most cameras (from a DSLR to Sony Burano) have at least a tiny bit of rolling shutter due to their sensor readout speeds. This means the pixels at the top of the frame get produced first with the bottom of the frame produced last. This can cause some issues with stabilizing, due to the subjects and background in your frame not always being 100% aligned. Premiere will still try to stabilize the footage, but it may have some trouble and add more Jell-o effect than you’d hoped. Cameras with a global shutter, like the Red Komodo or Sony a9 III, tend to fair better with stabilization, but most cameras utilize top to bottom readout.
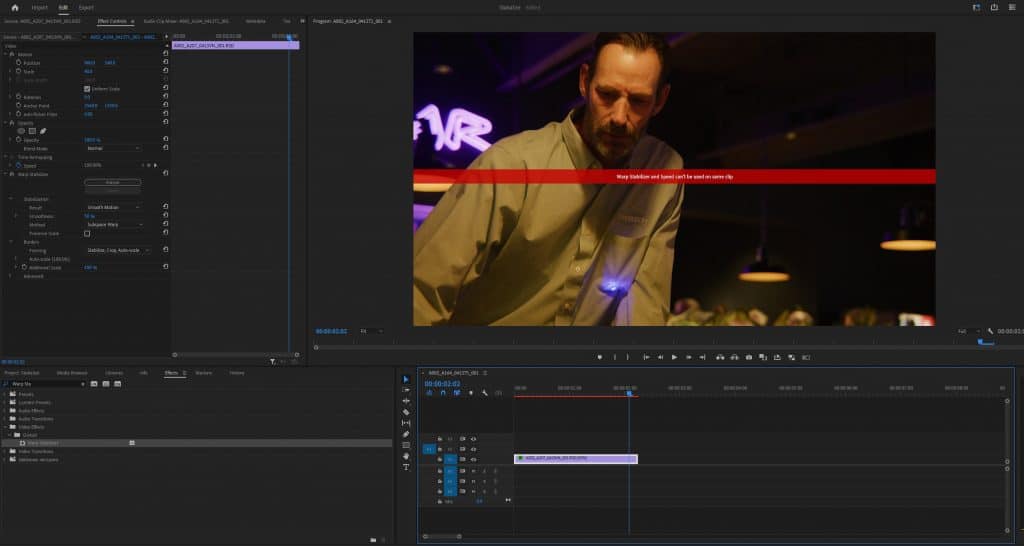
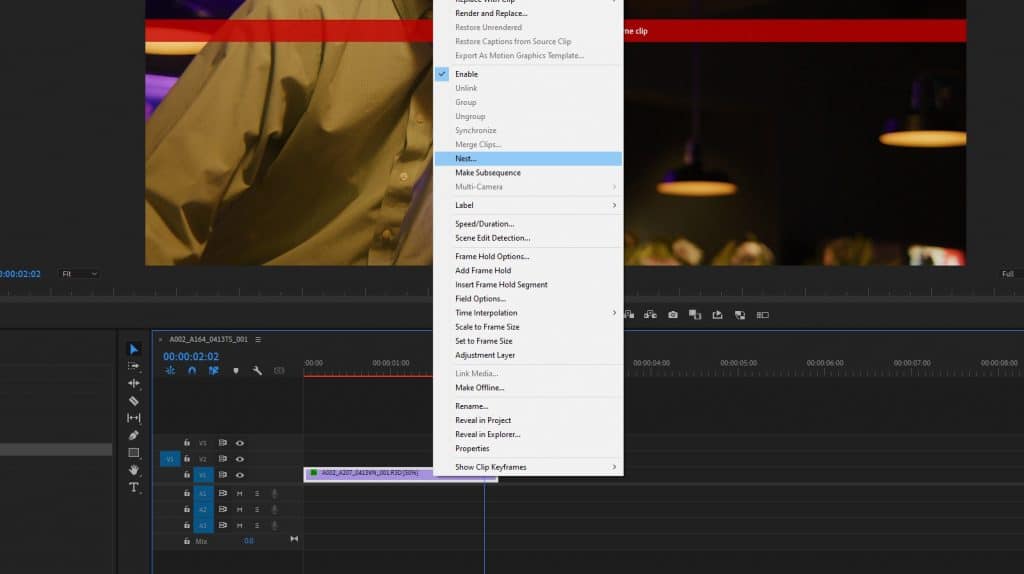
If you like using slow-motion, you won’t be able to adjust the speed of the clip and use Warp Stabilizer at the same time. Luckily, there’s a quick remedy to the situation. You’ll simply need to nest the main clip and add the warp stabilizer to the nest. Right-click the clip, and click Nest. This will create a timeline within a timeline. Within the nest, change the speed of the clip to your desired effect. Now, on the main timeline, add the warp stabilizer effect.
Stabilizing your footage in Premiere is pretty quick and easy way to make your footage look more professional. With just a few clicks, that shaky, handheld footage can look like it was on a tripod. It does take some time to get used to how Warp Stabilizer works, but once you’ve got a few instances under your belt, you’ll be incorporating it into your workflow in no time.
Looking for filmmaking tips and tricks? Check out our YouTube channel for tutorials like this . . .