In this tutorial, we’ll look at a simple approach to editing your footage in Adobe After Effects.
Editing a project in After Effects might feel like a strange choice if you’ve never done it before. If you find yourself in this situation, I think it’s safe to say you probably know your way around Premiere — or, at least, have been a part of the Adobe pipeline leading up to this moment. So the overall user interface and experience isn’t too unfamiliar. But, you might find yourself needing to edit a sequence or project (hopefully not the whole thing) in After Effects, so let’s talk about how to approach this with a “work smarter not harder” mentality.
Before we talk about editing the actual footage once you’ve brought it into After Effects, let’s talk about bringing your footage into the program. First, import your clips/footage into the project by going to File > Import > File. Then create a new composition by going to Composition > New Composition. Next, drag your footage onto the “New Composition” icon in the Project panel to create a new layer. Before we get into the specific written breakdown of how to approach editing in After Effects, be sure to check out this tutorial below. It’s incredibly thorough, and I’ve made sure to timestamp the video at the exact moment Gareth David Studio explains everything!
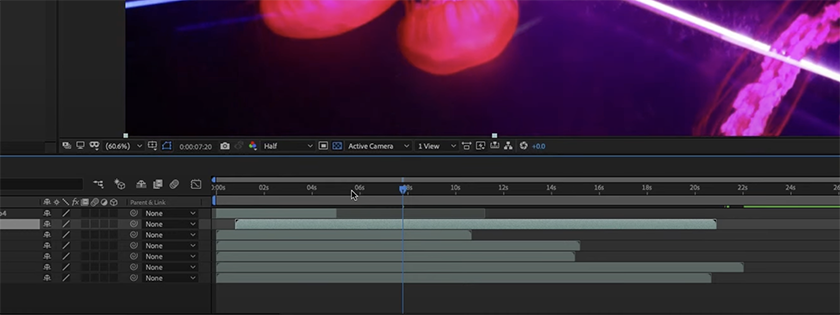
Now, to the editing! First things first, there’s not a traditional “cut” tool for your clips like you’d find in Premiere Pro. But one way to quickly cut a clip is to drag your playhead to the exact moment you want to cut, then go to the Edit tab, hit Split Layer, and this will cut your layer and clip into two. A quick workaround to this is just hit the keyboard shortcut Cmd + Shift + D (or if you’re on Windows, use Ctrl).
So now you’ll see two separate layers down in your composition. Your clip will still play all the way through as your playhead moves forward, uninterrupted. This is how you edit in After Effects, since you can’t cut a clip in two on the same layer. It’s kind of wonky like this, but really it gives editors more control over the individual clips and layers to play around with the footage and whatnot. This is where motion graphics would come into play, allowing specific “effects” to be applied to individual layers.
Another way to cut up your footage is to duplicate your layer and then drag the duplicate to whatever moment or position you want, then drag in the opposite direction for the clip above it. This will allow there to be two separate clips acting as one on two different layers. Make sense?
Another way to approach this is if you have multiple clips that you want pieced together in a specific way, you can bring them all down into your composition. Then if you drag them onto your timeline, they’ll be stacked on top of each other, and whichever clip is at the top will be the clip that plays as the playhead moves forward. But, if you drag the clip to the moment where you want that clip to play, you just remove the other clips by dragging them away, leaving that first clip as the clip that plays. It sounds more confusing than it is, but it’s basically just dragging the clip to be the right moment you need, and then just making sure there’s no other clip above it on the timeline.
As a little bonus, here are some common keyboard shortcuts for editing footage in Adobe After Effects that you can return to if necessary:
- Spacebar for Previewing
- “Cmd + /” for comment toggle
- “Cmd + Opt + /” for making masks
- “Cmd + T” for opacity
- “Cmd + Shift + D” for duplicating layers
- “Cmd + Shift + [ or ]” for moving layers up or down
- “Cmd + Opt + [ or ]” for trimming in or out point
- “Cmd + Alt + [ or ]” for moving the current time indicator
- “Cmd + Opt + T” for time-remapping
- “Cmd + K” for adding a new keyframe
Exporting Your Video
Once you’ve cut up your video, what next? Well, you can preview your work by pressing the spacebar or by clicking the Preview button in the Preview panel. Then you can render (or export) the final video by going to Composition > Add to Render Queue and then clicking the Render button. Naturally there are options for how you want to export, like the quality and codecs — this is standard for any NLE exporting process. So once you’ve selected a location to Render the video to, just hit the Render button, and voilà! You just edited a video inside After Effects. You did it. You’re the champion!
If you want to go even further down the After Effects rabbit hole, check out our latest tutorial . . .
Good luck on your After Effects editing journey, if you’re looking for more tips and tricks for your next edit, be sure to check out some of our previous articles!
- 10 Time-Saving Tips for Adobe After Effects
- Time-Saving Tips for Adobe Premiere Pro
- Filmmaking 101: How to Make a Documentary
- What Is Catch Light and Why Is It Important?
- How to Photoscan 3D Objects Using Your Phone—For Free
- How to Fit Stock Footage into Your Edit Seamlessly
Cover Image via Videvo.