If you’ve ever wanted to try compositing in After Effects, it’s easy to get started, and it’s even easier with some free stock clips.
There are few things in the pantheon of visual creative endeavors that I enjoy quite as much as compositing. It’s certainly not the easiest or fastest skill to learn — I wouldn’t say I’ve even scratched the surface myself. If nothing else, it’s an art form that helps you to appreciate the visuals around you — and the nearly impossible task of trying to re-create anything that looks like a 1:1 exact replica in a computer.
You may be wondering, “What exactly is compositing anyway?”
Compositing doesn’t have to be complex, CGI-based visual effects with 500 layers. Sometimes, compositing is just adding a bit more detail to a dull sky through a “sky replacement” — or even replacing the blank screen on a phone with the app you’re trying to advertise.
However complex you want to get with compositing, there are some things you’ll find yourself doing over and over that you’ll want get used to.
Whether you’re adding some floating dust particles or slowly moving smoke or fog to your scene, you’ll need to master a few techniques to get it looking right.
Motion Tracking
Motion tracking is one of the core aspects of compositing. If the shot is moving, you’ll need a rock solid track in order to keep all of your composited elements moving along with your shot.
After Effects has a great 3D camera tracker that will allow you to do everything you need, and best of all, it’s extremely easy to use. Just select your footage, and click the “track camera” button in the tracker panel.
After it’s had some time to think, you’ll be able to select tracking markers (usually points of contrast that the tracker was able to position through time) to which you can add solids, cameras, text objects, and more — these objects will now inherit all the motion of your shot.
The only real caveat to the 3D camera tracker is that when you’re unable to get a good track, you have to finagle it a bit.
Usually though, the track will be more or less spot on. Also, once you’ve tracked your shot, you can check in the stats section of the effect to see the average pixel reprojection error (i.e., you can tell how many pixels off your track could potentially be). Generally speaking, as long as your track isn’t more than 1.5 pixels off, you’ll be all right.
Choosing the Right Blend Mode
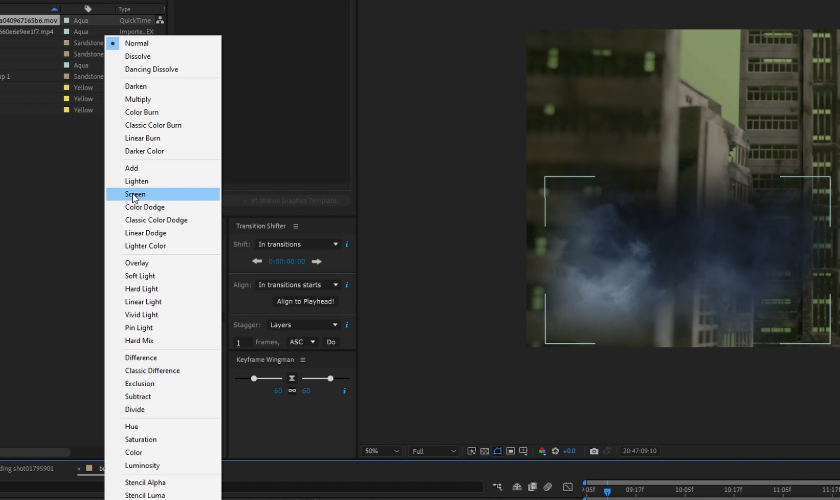
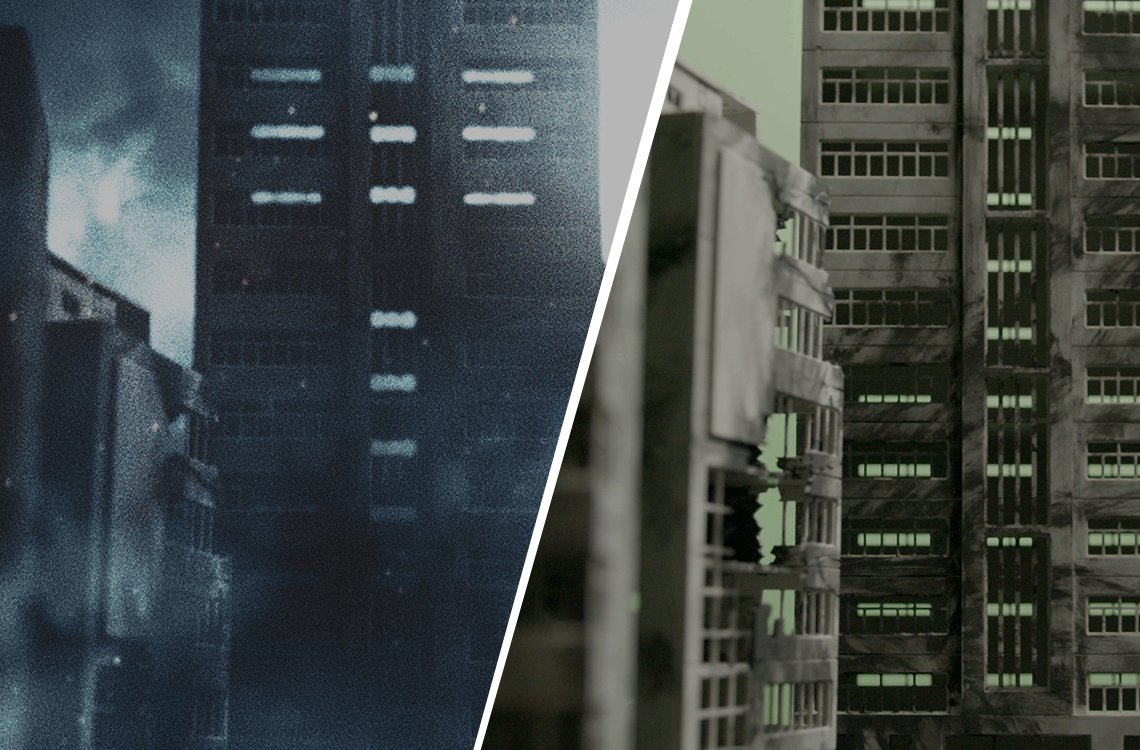
In the case of fog, lens flares, dust particles, and anything that is primarily light-based and was shot or created on a black background, you’re going to use the add or screen blend modes.
Add mode is an additive blend mode, which means it’s adding more output to a particular pixel, which means you’re adding brightness. In layman’s terms, that just means it’s more punchy and contrasty. Screen will be a much more natural-looking way to remove the black areas of the image — although, sometimes, it can be a little bit too soft.
In rare cases, you might want to use overlay or hard light, but that’s usually for more colorful overlays, in my experience (like adding a bit of cloud color or things like that).
All blend modes are actually pretty scientific in how they function, and a great majority of them actually come from photographic or chemical processes that were done well before computer-based design was even a thing.
It’s pretty fun to learn about what they all do and how.
Color Correction and Post FX
When it comes to compositing, the final phase of creating a decent-looking shot with everything you’ve added to the scene is the most important part.
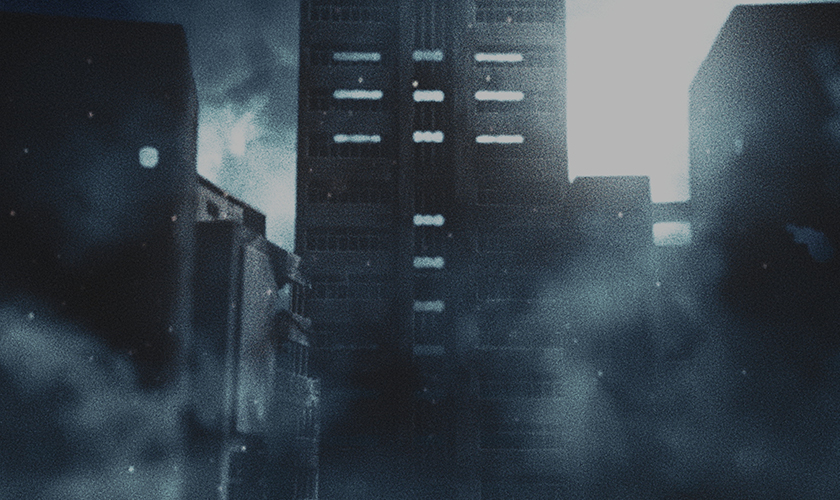
There have been quite a few composites I’ve done in my day that looked kind of awful until I added the right level of post-processing and color correction — things like glow, film grain, light wrap, and (most of all) color correction can drastically effect the realism of your composite.
It’s important to make sure that you’re at least somewhat-satisfied with your composite before you advance to this step because, from there, you’re only going to make it better.
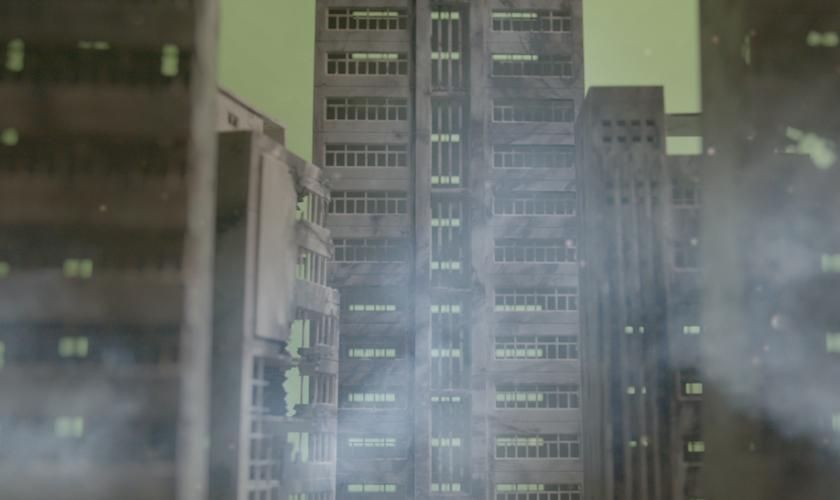
Color correction and post effects are what I consider the last 20 percent of the job. You should have it almost 80 percent of the way there before you start doing any of this stuff. In the picture above, you can see I haven’t added any film grain, color correction, or glow — or even keyed out the background yet.
I feel like it’s definitely best to do all of this after you’ve set up most of your composited elements, just so you have the most accurate canvas to work from, which will lead to far less repeated work.
A little bit of contrast and color correction at the very end will always be critical. It brings everything together. It kind of glues it into the same dimension, if you will.
Make sure you never skip this step.
Looking for some music for your projects? At Videvo, our library has everything from free ambient music to music for streams — perfect for any indie project:
- Royalty-free Christmas music
- Royalty-free meditation music
- Royalty-free upbeat music
- Royalty-free jazz music
- Royalty-free Halloween music
Need a break? Check out our videvoscapes — the ultimate reels for relaxation or concentration. Each videvoscape collects hours of high-definition nature footage and background video with downtempo chill beats for the ultimate escape from the grind.