
You know, at the moment, I seemingly can’t log on to Instagram or TikTok without seeing a content creator promote the latest AI tool, whether that’s image generation, text, sound, video, or, in today’s case, 3D character generation. There’s a new tool called Wonder Studio that will seemingly take your scene, scan it for human subjects, replace the human subjects with 3D characters, include the proper lighting on the character, and generate a clean plate with one click.
Now, I’m often slightly wary of any product or tool that says it can do something with nothing more than a singular click. It usually requires a little bit more work than that. But today, from an After Effects-based user who isn’t entirely versed in 3D compositing, we’ll see if it can bring me into that world without knowing all the ins and outs of 3D character creation.
Now, like writing an article about the tonal differences between playing in Drop C and standard tuning on a guitar, you’ll only ever understand the differences by listening to or playing it yourself. Well, this test is similar; you will only understand the differences by watching the video. However, I can offer you a guide on how to use the browser-based app below.
Wonder Studio Overview
Wonder Studio is an AI solution that seamlessly integrates CG personas into any live video. As previously noted, it not only adds 3D character to your composition, but it will do its best to replicate lighting style, create character movement, clean background spill, and more. If you’re a Blender user, you can export a Blender file further.
Once you’ve signed in, the primary interface of Wonder Studio will be visible in your web browser. I don’t want to oversimplify things, but the dashboard is designed for clarity and ease, and even non-editors could move around freely.
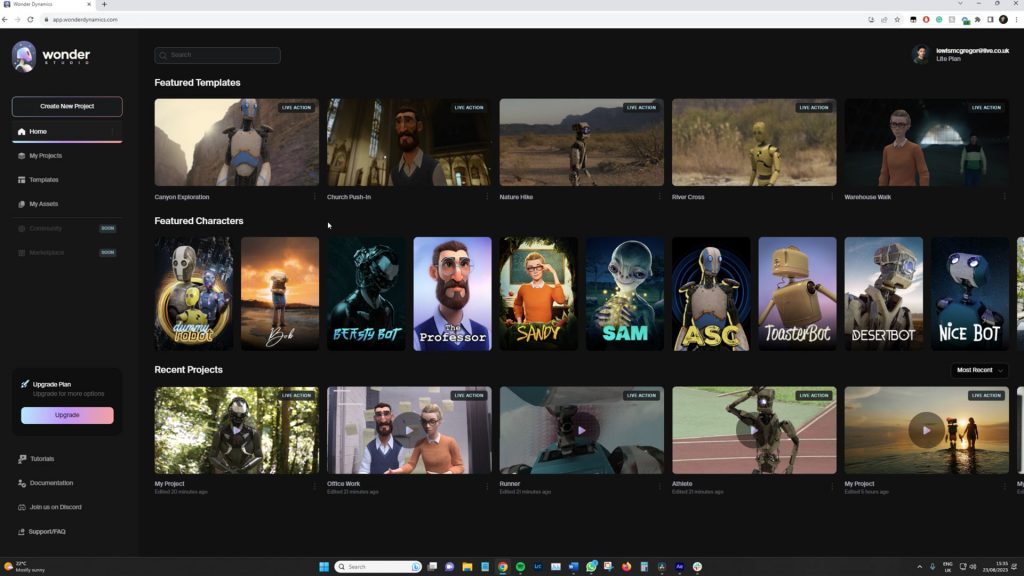
- Left-side toolbar: Houses essential controls, notably the “New Project” button
- Main area: Showcases pre-designed video templates so you can learn the application
- Persona gallery: Features characters you can use
- Recent projects: Displays your previous projects
- My assets: In the left-side toolbar, there is also a library of uploaded videos you have added
Tutorials and more resources can be found at the toolbar’s base, which includes the comprehensive “Character Creation Rules” series. It’s worth watching if you want to go beyond the basics.
Starting a New Project
Okay, to get started, click the “New Project” button. There will be two options you can select. Live Action Easy and Live Action Advanced. Depending on your subscription, you may only be able to select Live Action Easy. Clicking “Proceed” will take you to the operational interface of Wonder Studio.
Okay, let’s look at the interface.
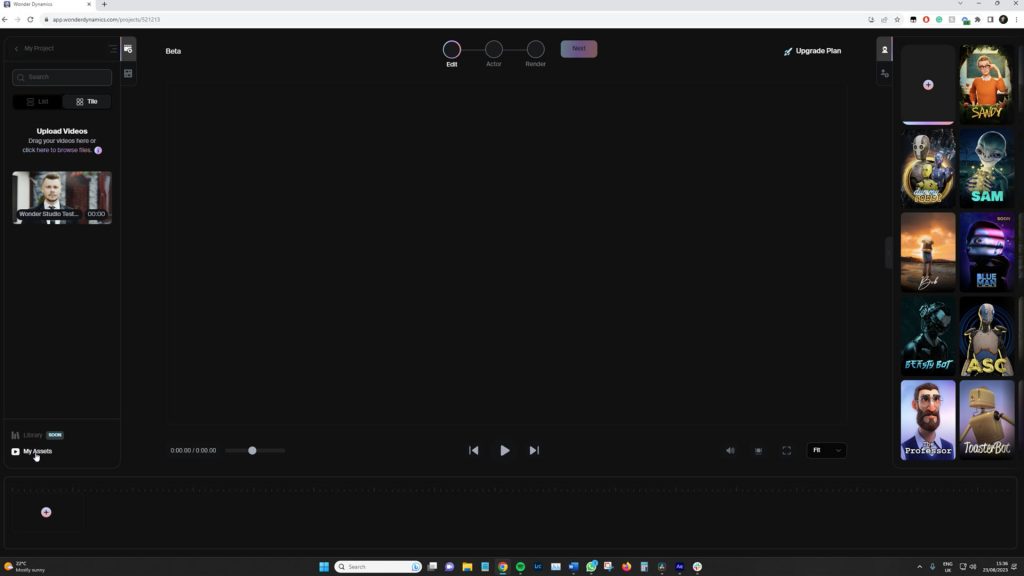
Adding Videos and Navigating the Interface
- Add Video: Start by adding the video where you plan to incorporate CG personas. Browse or drag and drop your video, and it’ll appear in the operational space.
- Rename Project: Click on the default project title to rename it, then press Enter. Your uploaded videos can be found under “My Assets.”
- Timeline: Located at the base of your workspace, this aids in video navigation (note, this is not an editable timeline like an NLE).
- Persona Gallery: To your right, view available personas. Click on “My Personas” to see those you’ve added and verified.
To put it bluntly, this is pretty much it. Whether you’re a seasoned veteran or a newbie editor, the layout resembles the likes of most NLEs, and it’s pretty evident how to use the software. You even get pop-up guides to help you along the way.
Once you have added the video clip where you want to replace the human subject with a CG character, you will need to click next.
Swapping Individuals with CG Personas
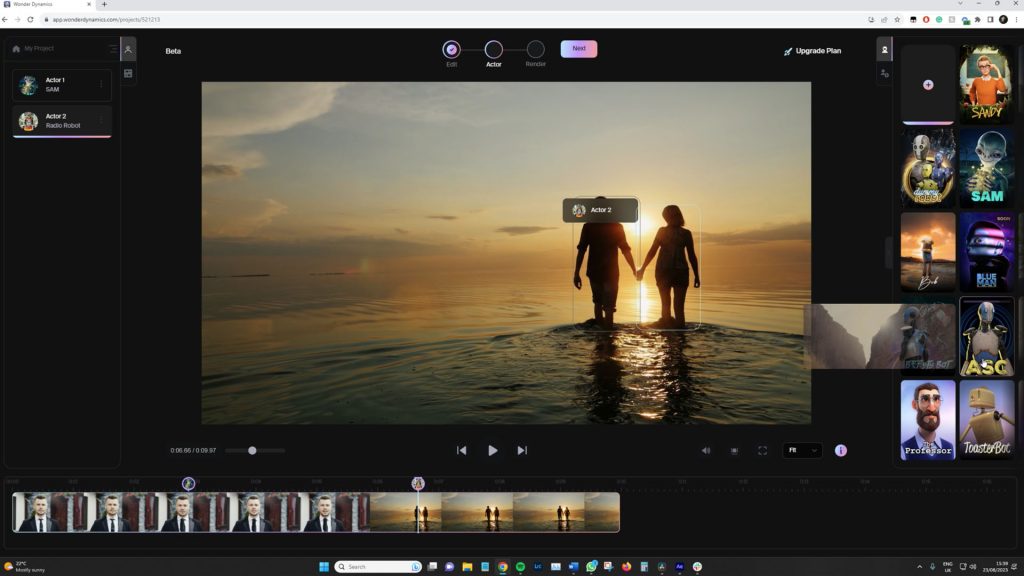
- Click the “scan frame for actors” button to inspect frames for individuals you’d like to swap with CG personas.
- After scanning, choose a persona from the right-hand side and drag it to the individual in the clip. This assigns the persona to that individual. This action can be repeated across different frames for different characters (however, you can only apply two characters while using the lite version).
- If Wonder Studio identifies a previously spotted individual, you won’t have to repeatedly assign the same CG persona. For instance, if you’ve assigned a robotic persona to an actor, it will be recognized throughout the video.
Once you’ve added the characters, hit next again.
Final Steps and Export
You will now be presented with an export box, and, again, the options available.
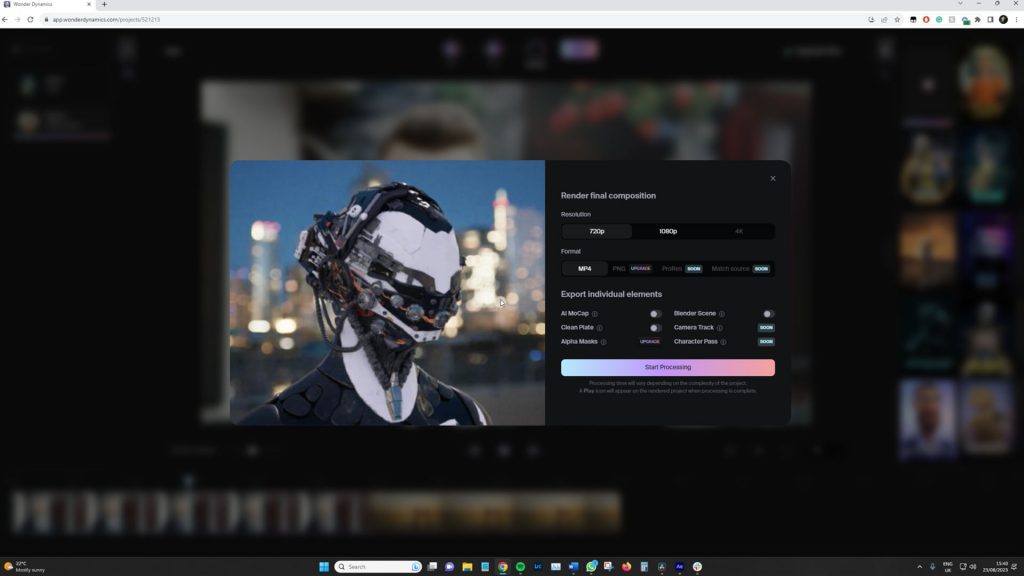
Choose your export preferences:
- Resolution: Tailor this based on your video’s original resolution. Options include 720, full HD, and 4K.
- File Type: Choose between MP4 or PNG for your video output
- Export Modules: Options include Blender Setup, AI Motion Capture (FBX movement), Clean Frame (actor removal), and Contrast Overlays (persona silhouettes in monochrome)
The preferences you choose will influence your final export.
Once you’ve finalized your choices, click “Start Processing.” The processing time will vary based on the video’s duration and quality, and the number of characters.
After processing, find your video in “My Projects.” You can preview the result by selecting the video, and there, you can also export.
That, my friends, is basically it. It’s a very straightforward AI application to use, and its results are . . .
s̴͓̥̤̭̿̓͆̂͜o̵̤͉͉̕ḿ̸̢̟͓͆ę̶̩̫̍̊w̶̿̊̈̍̕̚ͅh̶͈̎̑̋͆͘͠ḁ̵̜̏̎̎͠t̶͇̒̒ ̵̧͙̘̊į̴̰̯̥̩̀͆͋̆͘͜n̸̜͙̯̞̦̿̄͑ț̸̛̩̰̀̀͌͘e̶̻̪̰͕̥͘͠r̴̡͉̖̿̆͌e̸̖̊̀̀͆s̵̯͈̋ͅt̴̛̺̗̖̆̇i̷͉͖̘̠̭̓̓͠n̶̨͓͉̟̦̣̍g̷̻͉̪͎͈͖̐.
Oh, you can’t read that? You might just have to watch the video then!
Looking for filmmaking tips and tricks? Check out our YouTube channel for tutorials like this . . .