
AI has undoubtedly become a buzzword over the last few months. With the likes of Chat GPT and Midjourney, you can’t browse LinkedIn or Twitter for more than a few scrolls without seeing someone talking about how to “make money with AI.” I think that AI has been grouped into “generative technology,” tools that “create” with a prompt to the younger generation or those not entirely familiar with the technology.
But that’s not the case. In the medical field, AI can assist with electronic health records, autonomous vehicles use AI to navigate roads, and even the likes of Netflix use machine learning to implement thumbnail recommendations depending on the viewer. AI isn’t just confined to generative content, and with that, today, we’re going to look at several tools inside of Resolve that leverage both AI and machine learning to aid the editor in creating better videos.
Although we’re glad to offer a written version of the video for further reference, I strongly suggest watching the video for a comprehensive understanding, especially regarding the auditory segment, in the context of the tutorial examples.
Fusion Magic Mask
As of the 18.1 updates, Fusion has access to the machine-learning Magic Mask tool, previously only found on the color page. The general idea of the magic mask is that it removes the necessity for intricate rotoscoping and keying. With one stroke, Resolve’s Machine Learning Algorithm will be able to identify what has been painted upon and mask that area.
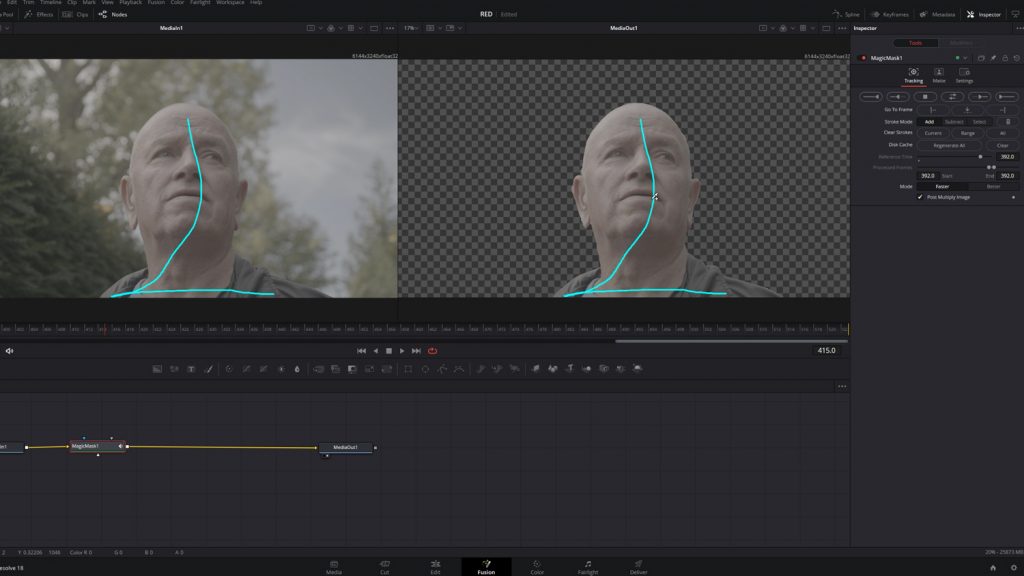
On the color page, the UI indicates that this is more about masking areas to be color-corrected, as we can see that it allows us to register parts of the body specifically. Whereas Fusion allows for instant rotoscoping for complicated compositing. Here’s how to get started:
- On the edit page, select the clip you want to work on, and then switch to the Fusion tab.
- Make sure the MediaIn1 node is selected, and then add a Magic Mask node either through the effects tab or the quick tool selection menu.
- In the inspector, ensure that the Magic Mask tool is active and leave the settings as they are for now, but set the stroke mode to “add.”
- Add strokes to the subject you want to mask, using a reference frame where the subject is in clear focus and capturing as many areas as possible.
- To identify missing areas, keep the MediaIn1 node active in the left viewer.
- Check the mask and add additional strokes as needed, changing the stroke mode to “subtract” for areas that should not be masked.
- Click “Better (Mode)” to improve mask accuracy.
- Fine-tune the mask by adjusting settings in the matte tab, such as filter, blur, erode, gamma, and threshold.
- Return to the tracking tab and start tracking the mask throughout the clip, using the appropriate button depending on where you applied the stroke.
- Wait for the tracking to complete, which may take some time, depending on your GPU.
Add any additional elements, such as text, and track them as needed.
These are the basic steps for using the Magic Mask feature in Fusion. This powerful tool allows even novice users to create excellent masks with minimal effort. For more complex masks, consider locking the Magic Mask and manipulating the mask separately to avoid accidentally undoing tracking.
AI Depth Map
One of the new features introduced in the 18.1 update is the Depth Map, which utilizes AI to produce depth data from video footage. This allows for the application of depth-based effects, such as selective focus, tilt-shift, and 3D compositing. By examining the perceived distance of objects within a video clip, the Depth Map feature generates an alpha channel that can be used to isolate specific depth areas for further image manipulation. For example, when coupled with a Fast-Noise plug-in, the Depth Map can simulate a fog effect in the distant background of a shot.
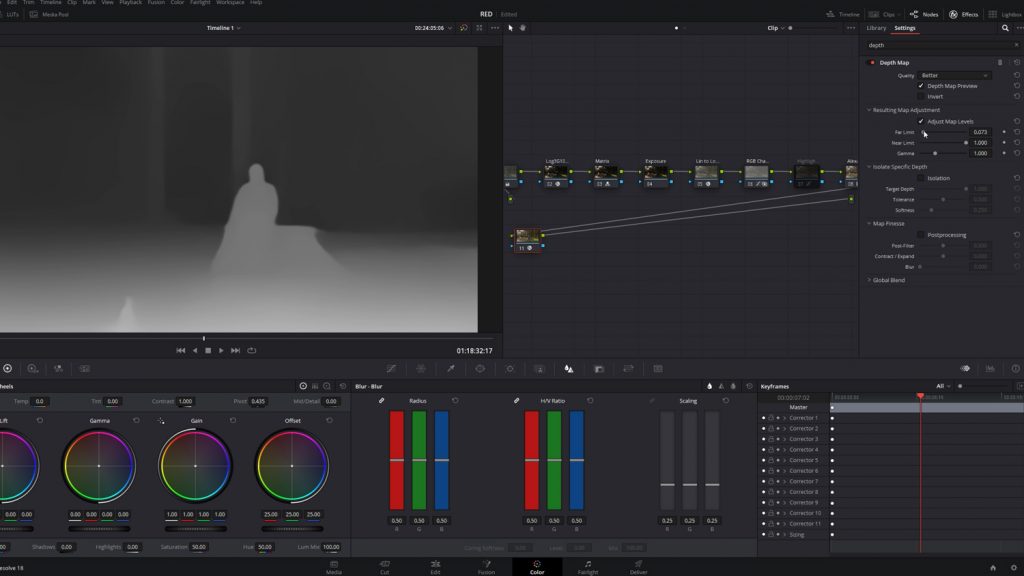
Similarly, the appearance of a foreground element, like a person, can be improved by adjusting the contrast, saturation, and sharpness, similar to using a qualifier. The Depth Map can also be used to fix issues in video, such as correcting a color temperature problem by selecting only the far window shot in daylight that caused the background actors to appear blue while keeping the foreground subject unaffected.
In today’s example, let’s explore fixing an out-of-focus shot. A few years ago, I created a tutorial explaining how to accomplish this using a power window. The approach involved selecting the prominent viewing area of the image, creating a mask around the eyes, and increasing sharpness. While this was an effective but temporary fix, a more efficient solution using the Depth Map is now possible. This approach can emulate the entire focal plane of a lens rather than just one area of the person.
To achieve this, add the Depth Map to an empty node and fine-tune the parameters until the alpha channel is precisely on the area you wish to affect. Adjust the map adjustment and isolate specific depth sliders to refine the effect.
Next, add sharpness to the node. As a result, sharpness is added to an image area that perceptually aligns with the focal distance rather than just one area. With the help of an AI-powered tool, this process can be accomplished in under 60 seconds.
AI Voice Isolator
One of the latest and most impressive features added to DaVinci Resolve is the Voice Isolator tool, which does precisely what its name suggests. This plug-in can eliminate unpleasant and loud sounds from pre-recorded voice tracks using AI models.
It can remove all kinds of unwanted sounds, from air conditioning, fans, and music, to even the noise of roadworks. Using the Voice Isolator is a breeze; activate the tool, and adjust the amount as needed.
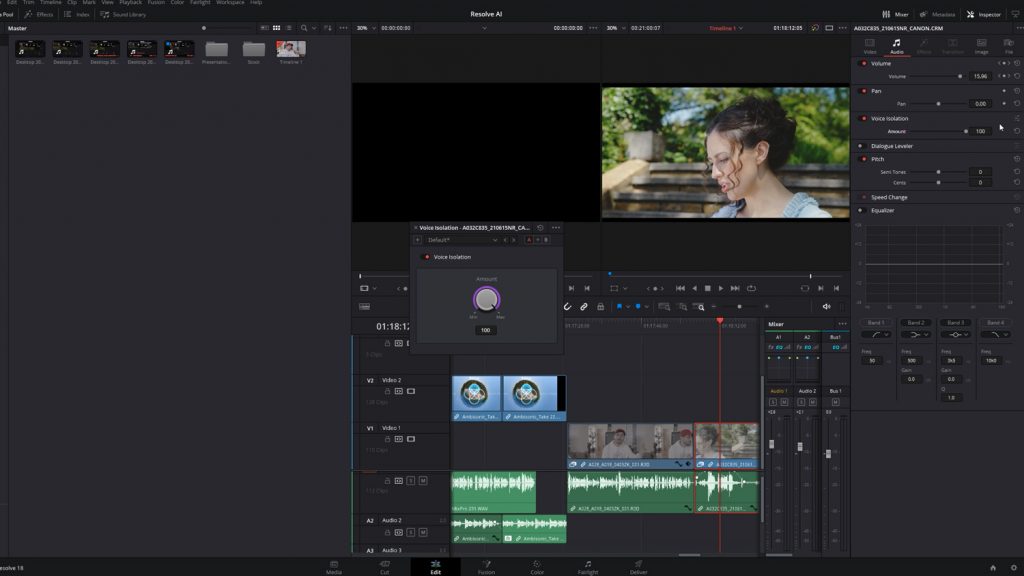
There’s no magic to this plug-in, and unlike opening a set of noise removal effects in most NLEs or DAWs, there’s just a simple parameter knob to adjust the amount of processing of the tool, and you’re set. This is one AI-powered tool that you need to try yourself, or at least watch the video to see how powerful the tool is.
AI Object Mask Tracking
Another exciting AI feature in DaVinci Resolve is Object Mask Tracking, which can detect and track objects in a shot without manual rotoscoping. This tool was initially available on the color page as a human-centric tool, with only two tabs available: Person and Features. However, it has since been updated to focus on objects, making it especially useful for isolating difficult-to-mask elements, like fire, for color grading or other effects. The Object Mask Tracking tool works on the same premise as the painted strokes from the Magic Mask tool, which we explained earlier.
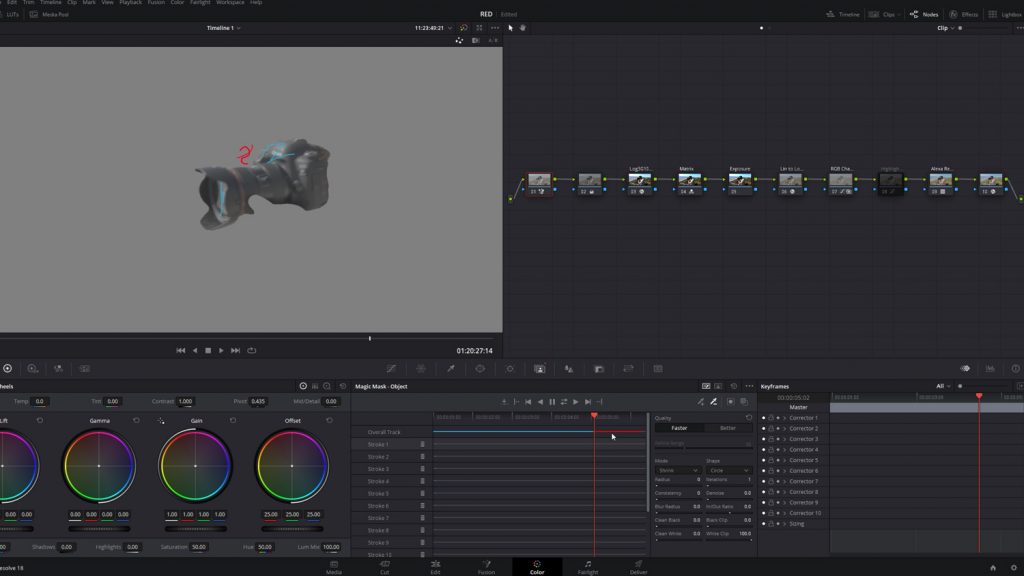
In the video tutorial, you can see how adept it was at masking the camera and how creative you can get when you can easily isolate objects within a scene.
Some pointers on using AI object mask tracking
- When using the Magic Mask, choose Object mode for any subject that is not a person, such as cars, devices, and food. For worn clothing items like shirts and hats that a person is wearing, you will still need to use Person mode instead.
- To select areas of similar contrast and color in Object mode, use positive strokes to link complex shapes together. Use negative strokes to remove regions from the object that you don’t want to isolate.
- There are two sets of controls for refining the mask: Quality, Smart Refine (Person Mode), and Refine Range (Object Mode). Of course, we’ll be looking at Refine Range. This allows you to adjust the sensitivity of the mask based on image analysis.
- Use the Consistency control to choose how much temporal smoothing is necessary to ameliorate jitter in the edges of the resulting mask in areas of low confidence. Lower settings will be faster and more accurate but may allow more edge jitter in the resulting mask. Higher settings apply more smoothing to the edges of the mask but are more processor intensive and may affect how closely the mask follows motion in the image.
- The second set of mask manipulation controls are for manipulating the mask after it’s been generated. These are the same Matte Finesse controls available in the Qualifier palette and are useful for fixing issues with problem masks or softening edges when a more feathered result is needed.
Conclusion
Although some creatives view AI as having a negative connotation, it’s important to understand that AI can be an asset in the creative process. With its ability to quickly process and analyze data, AI can help creatives make more informed decisions and gain insights that may not have been possible.
Moreover, AI can assist with tasks that were once tedious and time-consuming for creatives. With just a few examples in the video tutorial today, we can see that AI-powered tools can help with tiresome tasks like rotoscoping, freeing up time and energy for creatives to focus on more high-level creative tasks.
Looking for filmmaking tips and tricks? Check out our YouTube channel for tutorials like this . . .


