AI is a term that I once felt was exclusive to the banter shared with my gaming comrades. “Jeeze, the AI has got better this year.” “The AI is too hard on Nightmare difficulty.” However, over the last eight months, it now feels like I can’t escape the buzzword, and as a creative, there’s usually a sense of dread that comes with seeing it pop up. “AI is going to replace your photography gig . . .” Yeah.
However, every now and then, we come across great tools that enhance the creative experience instead of overshadowing it (like the Resolve AI voice isolation tool). Recently, we’ve witnessed several ad campaigns and music videos incorporating AI-generated content in a way that aids storytelling without relying solely on 100% AI-generated content. An example of this is the recent Coke advertisement. Recently, a new After Effects plug-in called Diffusae has come onto the market, and it’s pretty great.
Diffusae, created by BSKL, is a super-cool plugin that enables After Effects users to leverage the power of Stable Diffusion directly in After Effects. The plugin allows you to create AI-driven image generation without needing cloud-based rendering services. While the video tutorial above serves as the primary guide and a must-watch to see the visual moving examples, this article will explore the features of Diffusae and its simplified workflow.
Basic Usage
Getting started with Diffusae is simple and intuitive. Add your video clip to a composition, and then you can apply the Diffusae effect directly to the clip or use an adjustment layer. You’ll also need to create a text layer to provide prompts for the generative AI process. The text layer can be hidden throughout the process, as its visibility is not essential to the final output.
Within Diffusae, you’ll need to use the text layer as the “Prompt” parameter, defining the creative direction for the AI-driven image generation. Next, choose one of the four available stable diffusion models. Upon completing these tasks, you should observe changes in your image within the After Effects viewer.
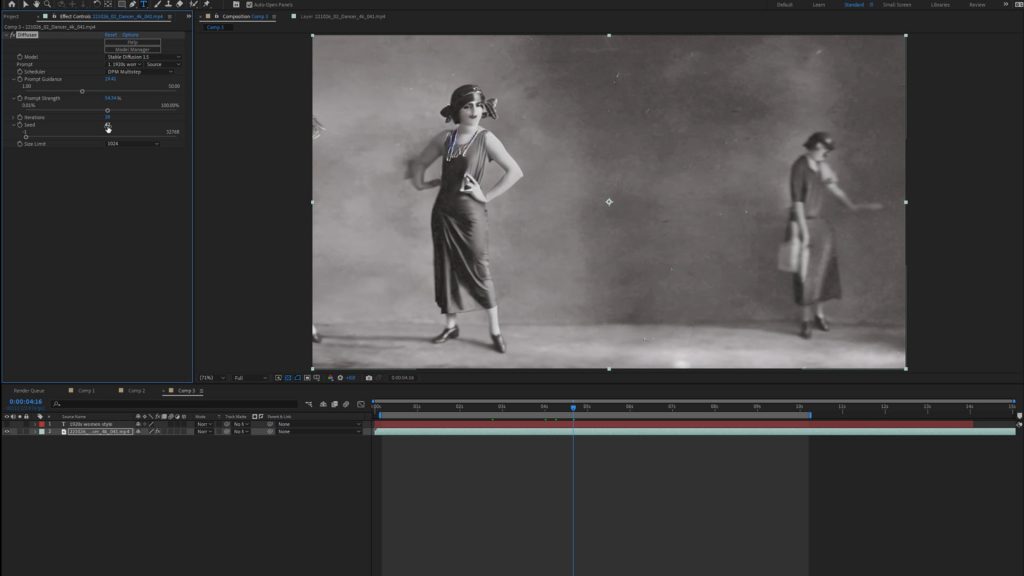
At the bottom of the effects control panel, adjust the size and iteration of the generated image before tweaking the prompt strength and prompt guidance. Increasing the max size parameter enhances image quality, but it’s essential to consider the available VRAM on your GPU, as larger sizes may consume more memory resources. Iterations can help generate a higher-quality image, but there’s a caveat. While higher iteration values generally yield better results beyond a certain threshold (around 40), the visual improvements may become negligible.
Users can reduce the iteration value to render preview images with shorter rendering times for faster exploration of styles or seeds.
Now, let’s discuss prompt guidance and strength. Explaining these can be somewhat challenging since they are similar, affecting each other but also being independent controls. A good way to understand this is that prompt guidance determines the weight given to the prompt. For example, with a prompt near 1% and the strength at 35%, the prompt has little impact on the image. However, the prompt becomes more noticeable when we increase the guidance to 28.

On the other hand, strength determines how much of that weight is passed through to the entire image. Even with a guidance of 28, lowering the strength results in minimal filtering effects. Conversely, increasing the strength to 50 allows the prompt to exert more influence over the original image. The strength slider helps preserve the original motion of your image.
Users can also utilize After Effects’ keyframing capabilities to animate the source text of the text layer, enabling dynamic and evolving generative AI results.
Local Rendering
One of the key advantages of Diffusae is its reliance on local GPU power for rendering in After Effects. Unlike cloud rendering services, Diffusae allows users to maximize their hardware capabilities and render images using their GPU resources. This local rendering approach ensures faster processing times and greater flexibility, enabling users to generate images without limitations on the number of iterations.
Conclusion
With the Diffusae plugin, After Effects users can seamlessly integrate Stable Diffusion’s and generative AI’s power into their creative workflows. Diffusae offers a simplified installation process, a wide range of customizable parameters, and local GPU-based rendering, empowering users to explore, interact, and create visually stunning AI-generated images without expensive cloud-based solutions. Whether you are a motion designer, video editor, or visual effects artist, Diffusae opens up new possibilities for artistic expression within the familiar environment of After Effects.
Looking for filmmaking tips and tricks? Check out our YouTube channel for tutorials like this . . .


