
Here’s how to quickly reframe, resize, and recut your exported YouTube to be ready for TikTok.
In this article, we’re going to talk about repurposing your videos for TikTok. It’s a quick, simple solution that will give your videos more eyes than you’ll ever imagine, in part thanks to TikTok’s algorithm. The need to make vertical videos is more important than ever because today’s clients will almost certainly want one or several vertical cuts for their various social channels.
So, this guide is perfect for taking an already-edited and -exported video that you’ve published to YouTube and repurposing it for TikTok. It’s a painless, quick process that will inevitably come up in your pipeline soon.
What Aspect Ratio Should You Use?
To get the most out of the “vertical” aspect ratio that TikTok and Instagram Reels require, we’re going to go with 9:16 — this is the ratio you need to use, regardless of your export resolution. So if you’re exporting a 1080p video, be sure to set your resolution at 1080 horizontal and 1920 vertical. If you’re exporting a 4K video, you’ll want to go with 2160 horizontal and 3840 (or 4096) vertical.
Using Premiere Pro
So to kick things off, if you’ve opened up Premiere, you’ll just want to look up top at Sequence, then hit Sequence Settings. From here, you’ll get the option to change the overall resolution, which means you can change the ratio to fit that sweet “9:16” number we mentioned up top. Once the video has been changed to meet this vertical aspect ratio, what next? What if your video that was originally shot horizontally and meant for YouTube with subjects on the right side or left side of the frame? Never fear, Premiere Pro has you covered with a brilliant little tool called “Auto Reframe Sequence.”
All you have to do is go back up to Sequence and then scroll down to Auto Reframe Sequence, and Premiere will detect where the subject is in the frame and center the shot accordingly. It’s pretty remarkable, and if you’re in the business of cutting these TikTok and any type of social videos regularly, this is your new best friend.
While this next tip isn’t a necessity, I will say that if you’ve got your timeline open, and you want to play around a bit with form and pace . . . let’s chop up the video a bit! What do I mean by this? TikTok videos thrive on fast cuts and high energy. So, I’ve found that if you can cut down the video to fit a shorter, more TikTok-friendly run time, your views and engagement will improve.
A great way to do this quickly is to take your exported YouTube video, bring it onto your timeline, right-click, and hit “Scene Edit Detection.” This will automatically apply cuts to your clip based on where Premiere sees cuts within the video. So this helps you trim the video down while getting it ready for TikTok. You can see exactly how this is done in the tutorial above (it’s timestamped).
Also, one last quick tip, be sure to turn the sound off before you export, if you’re planning on using a specific song or separate audio for the TikTok you’re creating. Just a heads up! Okay moving on.
Using Final Cut Pro
Now, if you’re bringing your YouTube video into Final Cut Pro, when creating a new project you’ll be presented with options to set your resolution and aspect ratio. But let’s say you’re working within the project from which you originally exported your video. Similar to Premiere Pro, you’ll want to dive into the Timeline Settings, which you can find by first Duplicating your project. So find the project file first, right-click, and hit “Duplicate Project As.” This will bring up a window that shows you the aspect ratio, along with some other setting to establish before jumping into your new duplicated project. In the dropdown next to “Video,” you’ll find the “Vertical” option. Click that. Voila!
But let’s say you need to reframe certain clips to fill that vertical frame? Just like the Auto Reframe tool from Premiere, Final Cut Pro has its own “reframing” tool called “Smart Conform” that will automatically center the subject of the frame in the center of your vertical frame.
Using DaVinci Resolve
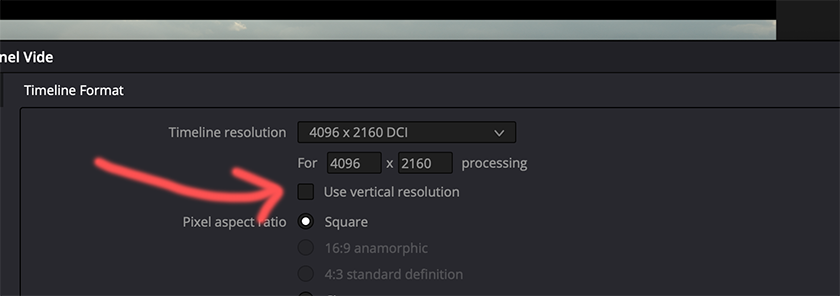
If you’re using DaVinci Resolve, you’re in luck! This process is as simple as can be. Once you’ve got your timeline open, go to File > Project Settings, and then you’ll see the dropdown for choosing the Timeline Resolution. Before you click anything, look right below this dropdown at the box directly underneath titled “Vertical Resolution.” Check this box! Whatever resolution your project is currently set to, this will reverse the resolution to meet the Vertical aspect ratio that you need. It’s so simple.
From here, you’ll need to resize and reframe the clips on your timeline to fit the new resolution. Resolve’s version of the “Reframing” tool is just called “Smart Reframe,” and you can find it under the Video section on the right. So highlight the clip in question, and then you’ll see you have the option to use “Auto” or “Reference Point.” The Auto feature obviously tries to detect where the subject is and reframes accordingly. The Reference Point feature requires you choose where you want the clip reframed. It just gives you more control.
Now if you don’t have either of these programs and you want to take an old YouTube video that you made a few years ago, you can always download the Free version of DaVinci Resolve. If you’re interested in dipping your toes into the world of the Creative Cloud, Adobe Rush is a great option that keeps the monthly fee low with social-cutting capabilities high. Be sure to check out our extensive guide on choosing the right NLE for your next project so you can explore all the options!
Cover Image via Videvo.
Looking for filmmaking tips and tricks? Check out our YouTube channel for tutorials like this . . .
Looking for more tips and tricks? Check out these articles.