Earlier this week, Tom and I headed down to London to do some aerial filming for Videvo. We had an awesome time, so much so in fact I had to write an article about it! We’ve needed aerials on Videvo for a while, so recently I got in touch with a local helicopter company and organized a flight over London. Aerial videography is something we are very new to, and this was our first time heading into the sky for filming purposes.
We prepared as best we could, doing some research, asking friends who do aerial videography and generally making sure we knew what the deal was prior to embarking on the trip.
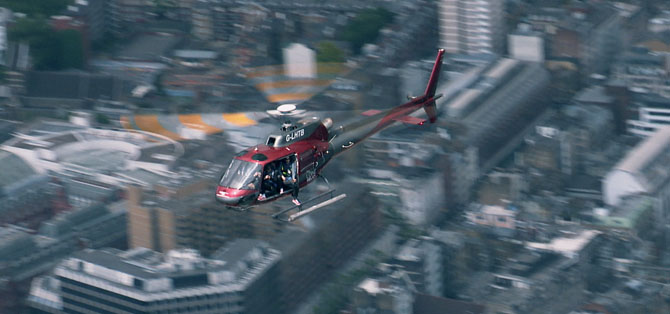
I was in helicopter A (red) and Tom was in Helicopter B (yellow). Heli A had the doors off from the start, whereas heli B’s doors were on and opened once we arrived over central London.
Gear Selection

Due to the nature of aerial videography, there were a few bits of kit we needed to add to our arsenal in order to be effective while in the air. We had to travel light, due to the nature of the shoot; we only took the bare minimum.
The main problem we foresaw was stability. We were going to be moving at approximately 100 miles per hour in between hotspots, dropping to about 50 when while circling them – that’s pretty fast when you’ve got the doors off. We also spent a lot of time hovering, and although we were relatively stationary, there was still a huge amount of vibration and turbulence to deal with.
To combat the expected stability issues, we hired out a couple of stabilization options.
The first was a Kenyon KS 4×4 Gyro.

This thing is amazing. Designed for smaller cameras, the Kenyon 4×4 is a gyro that attaches to the bottom of your camera with the standard screw mount. The unit is powered by a battery that can be worn around the waist by with a belt strap – ideal for these types of shoot. It’s extremely simple to get shooting with; simply connect the battery to the gyro, attach the gyro to your camera and you’re good to go. It takes a while to get up to speed after switching on – around 5-10 minutes to really get into its stride. Once it’s had a chance to warm up just start shooting and it will be working away underneath your camera to make sure your shots are as stable as possible. Tom was using this on his PMW-200 and managed to achieve some great shots with little/no post production required.
I was using a Glidecam 4000, which works with a weight system.

We had rented both systems, and had to drive to central London from Oxford to pick them up and then back out of London to get to the helis, which would bring us back into London. We left Oxford at 6am and arrived at the airfield at 10.30 (slightly later than we had planned). Due to time constraints we had no time to test any of the kit, and had to simply assemble the kit straight out of the bag and hop on the helis – this is certainly not advisable. My Glidecam’s weights weren’t right, and due to that it was all over the place, which meant I had to ditch it and go freehand instead. Luckily I was using a lens with a built in image stabilizer, which mitigated some (but certainly not all) of the motion. A bit of stabilizing in post dealt with the rest – not an ideal solution but the results were acceptable.
The rest of our kit comprised of 3 cameras; a 5D Mark III, a Sony PMW-200 and a GoPro. As this was our first time doing this we essentially treated it as a test-shoot, with the view to head back into the sky with some serious 4k hardware next time. We thought it was smart to get some airtime first before going all out on renting crazy gear – we’re glad we did!
Things We Learnt

I thought a few of you who may be planning your own aerial shoots might benefit from some of the things we learned while we were in the air. I’ll note down a few things I feel first-time aerial videographers should be aware of in the hope that some of it useful to you.
Stabilization is key – An obvious first one, but you really need some sort of stabilization. The best pilot on earth won’t be able to protect you from the inevitable vibrations and turbulence once you’re in the air. For us, the winner in terms of stabilization was without doubt the Kenyon 4×4. Although it is designed for smaller cameras it did a great job at stabilizing the majority of shots with the PMW-200. The Glidecam worked to an extent, but was tricky to maneuver for certain shots and was not as effective at removing the small vibrations as the Kenyon gyro.
Wear Appropriate Clothing – It’s important to wear clothing that helps you perform effectively. If you have the doors off (which ideally you should), as soon as you take off the temperature inside the cabin will drop dramatically – it is therefore essential to wrap up warm; in some cases it may be necessary to wear gloves, particularly if you’re filming during the winter months. Combat trousers with additional pockets for things like batteries, media etc. would have been ideal, but alas we did not take advantage of this. Sturdy footwear is also important so as to ensure you don’t injure yourself when entering/exiting the aircraft.
Secure Loose Items – If you have loose items, for example lenses, batteries etc, make sure they are in a zipped pocked or secured zip bag. Anything left unsecured while in the air will likely be making a quick trip back to terra firma.
Use Wide Lenses – Long lenses are a lot more sensitive to vibrations than wider ones, so if in doubt go wide on your shots. Even with a gyro and optical image stabilizers it’s going to be a lot harder to pull off the shot if you’re using a longer lens. Take this into consideration when prepping; find out how close the heli is allowed to go to your target as you may find you can get close enough to achieve the shot with a shorter lens than you initially thought.
Communicate with the Pilot – It’s very important to talk with the pilot throughout the flight. You’ll likely meet on the ground prior to your trip and they will probably be the one to brief you. Have a chat with him/her and build a rapport – once you’re in the air you’ll need to work closely if you want your shoot to be a success. You will be provided with a headset for direct communication with the pilot – if you’re sticking your head out of the door during flight remember to adjust the microphone so it is out of the path of the slipstream as that will transmit through the open loop communications system and could be disruptive.
Positioning – There are two main ways to work from a heli with an open/removed door. Firstly, is in your seat, belted in but leaning out somewhat. This is relatively effective and comfortable. This also shields you from the wind somewhat. I used this position with my Glidecam initially as it shielded my entire camera from the wind.
The second is to sit on the floor whilst wearing a harness, with your feet resting on the skids – this gives you incredible opportunities to pan and tilt, but you are a prime target for the wind, which can be disruptive. You can not stay like this for the whole journey though, you have to transition into it once you’ve reached your target due to how powerful the slipstream is when the heli is at full pace.
Health and Safety – Ultimately when shooting aerial footage, health and safety comes first. Pay close attention to what is said in the safety briefing and absorb the information like a sponge. Don’t approach the helicopter until instructed to do so by the pilot or ground staff, especially if the rotors are still moving. Wind can sometimes blow rotor blades below head height, which can (and has) result in catastrophe.
Communication – When you are in the air you’ll have a headset connected to an open loop, where all you have to do to be heard is speak. The captain can chose to isolate individuals if he can’t hear you properly, but for the most part expect it to be all of you. Remember, he has to talk to the ground as well – he may isolate himself for this, so if you ask him for something twice and he doesn’t respond, a polite tap on the shoulder is best practice. He’ll then be with you as soon as he can.
Always ask the pilot what he can do to assist you with a shot, or if you know what the helicopter needs to do to achieve it, explain it concisely and let him get to work.
Bring a Sick Bag (Just in Case!) – we had an incident where one of the photographers got travel sick and this lead to an extremely frantic evacuation of the photographers lens bag in order for him to use it for something which it certainly was not designed for. If you get travel sick, it’s very likely you’ll feel a bit queasy flying around in a helicopter.
Insurance – Make sure you have adequate insurance before you go anywhere near an aerodrome – if you already have insurance it is very likely it is not included in your current policy, so check the small print. You will need insurance for equipment, public liability and also employer’s liability if you are employing videographers to help you out.
Health and Safety

Listen to the health and safety briefing at the start, don’t be the guy updating his Facebook status to say “OMG IM GOING FLYING GUYS” while the pilots explaining how emergency procedure works. Firstly, that’s just stupid. Secondly, the pilot will not respect you, and this can easily affect how productive your shoot is.
You may spend a lot of the flight calling the shots, but ultimately the pilot is in charge. This is paramount and must be absolutely solidified in everyone’s mind.
I’d heavily dissuade anyone from using homemade mounts. All the vibrations, wind and other factors up there means it would be easy for something to come loose. One small widget coming off and flying into the wrong place could be disastrous. It’s not worth it – either use a proper mount or don’t use one at all.
If you happen to find a random nut or bolt in the heli, give it to the pilot – don’t just ignore it. It could have come from somewhere important, it could also get picked up by the wind and hurled somewhere.
I think that’s all from me. Now check out this short clip showing some of the footage we got on the day:
London Aerial Stock Footage Shoot – Videvo.net from Videvo on Vimeo.
I hope you enjoyed that, I know I did! Please remember we have an incredible prize for this months Videvo competition – info here.
Thanks for reading,
Harry, The Videvo Team